How To: Chevron Platter
November 12, 2013
The popularity of chevron patterns is going strong, and we constantly get customers who are trying to figure out the best way to create this seemingly simple pattern. We’ve scoured our sources and come up with what we think is the best way to get a perfect chevron pattern for your pottery pieces. This design works best on flat-ish surfaces – the more curved, the more difficult it becomes. But for plates, platters, canvases, trivets and more this is the best way we know how to make the perfect Chevron!
- Large Italian Bread Platter
- Scotch Tape
- Carbon Copy Paper
- Pistachio Glaze
- True Blue Paint Pen
- X-Acto Knife

Here’s How…
- Dust your piece with a DRY paper towel (any moisture will cause the scotch tape not to stick in the next step).
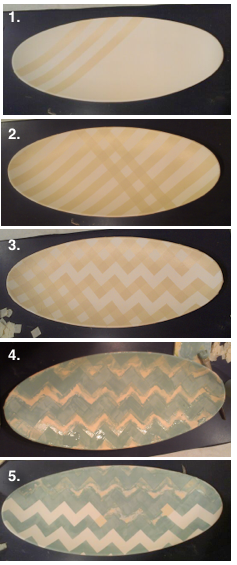
- Line up your scotch tape diagonally all the way across the Italian Bread Platter, leaving a space the same thickness as the tape itself. (Tip: You can use a spare piece of tape to help make your lines even.) Try and keep the tape lines straight, but go slightly with the curved surface at the edges.
- Cross your scotch tape at a 90 degree angle with another layer of scotch tape. (In the spaces in between the tape, you should be creating little squares of uncovered space.)
- Take an X-Acto knife and, using the edges of the tape as a guide, cut away alternating squares of the tape, leaving you with a zig-zag (or chevron) pattern). See third picture as a reference.
- Paint three coats of Pistachio (or any other light to medium color) glaze in between the pieces of tape.
- Once dry, peel back all remaining tape to reveal the chevron pattern below.
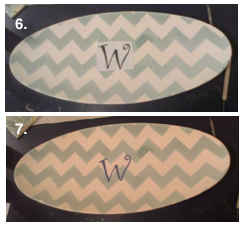
- Print out your monogram and use a piece of carbon copy paper to trace it onto the middle of your platter.
 Use a paint pen to fill in the monogram.
- Sign the back of your plate with your name or initials, and let a sales associate know you are finished!
This entry was posted in How To Tuesday, ideas. Bookmark the permalink.


